Docker - A Simple Use Case
In a previous post, we showed how to setup an Apache web server on an Amazon EC2 instance.
This was fairly quick and straightforward. However, when deploying an actual web application, it is likely to take a lot longer as your application will have dependencies and require other software to be installed, run-time environment variables need to be set, the web server needs to be configured, etc.
Further, what happens if one day you want to deploy your app on a different server? Will it work out-of-the-box? Do you remember all the steps to do the configuration, setup, etc.? Do you have the necessary tests ready to check the deployment went successfully? Even if all this is documented, you will have to follow each step carefully. Upshot - all this can be time-consuming and stressful.
Enter Docker to the rescue. Your whole app and everything required to run it is packaged neatly into a self-contained unit, a Docker container which is simply a Unix process. All you need to do is start it.
In this post, we are going to setup the simplest possible web application on a new server using Docker. All the app does is serve up a single static HTML file, i.e. the app consists of just a homepage.
Step 1
Login to your new server. As the server is new, there is no web server software (Apache, Nginx, etc.) installed thus navigating to http://myipaddress returns an unable to connect error in the browser (even after opening up port 80).
Step 2
Install Docker. The exact command(s) will depend on your server’s OS, but on Amazon Linux AMI
sudo yum install -y dockersuffices.
Step 3
Start the Docker service
sudo service docker startStep 4
We are going to use Apache to serve up our homepage. Usually, we look for /var/www/html and place our HTML files there. However, as Apache isn’t installed, /var/www does not exist.
Instead, our app is housed in the following directory structure
home
└── ec2-user
    └── project-root
        ├── Dockerfile
        └── public-html
            └── pokemon.html
pokemon.html contains our homepage’s HTML
<table>
  <tr>
    <th>#</th>
    <th>Pokémon</th>
    <th>HP</th>
    <th>Attack</th>
    <th>Defence</th>
    <th>Speed</th>
  </tr>
  <tr>
    <td>001</td>
    <td>Bulbasaur</td>
    <td>45</td>
    <td>49</td>
    <td>49</td>
    <td>45</td>
  </tr>
  <tr>
    <td>002</td>
    <td>Ivysaur</td>
    <td>60</td>
    <td>62</td>
    <td>63</td>
    <td>60</td>
  </tr>
  <tr>
    <td>006</td>
    <td>Charizard</td>
    <td>78</td>
    <td>84</td>
    <td>78</td>
    <td>100</td>
  </tr>
</table>
Step 5
At this point, it is worth saying a couple of things about Docker images and containers.
A Docker image is to a Docker container what a class is to an object in OOP, i.e. one can think of the latter as an instance of the former.
So far, all we have done is start the Docker service. We have no images nor containers, thus
sudo docker image lsand
sudo docker container lsreturn nothing.
In OOP, we know that before we can create an object, we need to define a class. Similarly, before creating any containers, we need an image. Images are created via the Docker command build.
Go into the project root
cd ~/project-root # adjust accordinglyBy default, build looks for a file called Dockerfile in the path specified. It also takes a bunch of options
sudo docker build --helpIn particular, we are interested in
-t, --tag list Name and optionally a tag in the 'name:tag' format (default [])A Dockerfile is just a text file, in our case with the lines
FROM httpd:2.4
COPY ./public-html/ /usr/local/apache2/htdocs/
As our Dockerfile is in the project root,
sudo docker build --tag=myfirstdockerimage:v0 .should output something like
Sending build context to Docker daemon 3.584 kB
Step 1/2 : FROM httpd:2.4
2.4: Pulling from library/httpd
aa18ad1a0d33: Pull complete
57095d1c44f2: Pull complete
b020b6bcf3ce: Pull complete
c2a092dd4899: Pull complete
df8c38ba7997: Pull complete
f6150a1ea909: Pull complete
59a7f628db89: Pull complete
Digest: sha256:9fb3f88deb7b743e10261d4c91614b085fe5d85c11a244fca5fad5bb0edea491
Status: Downloaded newer image for httpd:2.4
 ---> b669148bb5a5
Step 2/2 : COPY ./public-html/ /usr/local/apache2/htdocs/
 ---> c0b0772949bc
Removing intermediate container 08e120a74476
Successfully built c0b0772949bc
on the command line which means we just created our first Docker image!
The first line of our Dockerfile downloaded the image of a bare-bones Linux environment with Apache 2.4 installed from the offical Apache Docker repository, the second augmented this image by copying the contents of public-html into /usr/local/apache2/htdocs/ in the newly-created Linux environment.
Now,
sudo docker image lsshould output something like
REPOSITORY           TAG                 IMAGE ID            CREATED             SIZE
myfirstdockerimage   v0                  c0b0772949bc        53 seconds ago      177 MB
httpd                2.4                 b669148bb5a5        32 hours ago        177 MB
which shows Docker incrementally builds images following the Dockerfile line-by-line.
Step 6
Now that we have an image, containers can be created from it. This is done via the Docker command run
sudo docker run --detach --name=pokemon --restart=always --publish=80:80 myfirstdockerimage:v0Here we use the options name to specify the name of the container, restart to automatically restart the container if it crashes, publish to map the relevant port inside the container (here 80) to the desired port on the server (set by convention to 80). We supply the name and the tag of the image we wish to run (if we omit the tag, it defaults to myfirstdockerimage:latest which errors as this image does not exist).
This should output something like
CONTAINER ID        IMAGE                   COMMAND              CREATED             STATUS              PORTS                NAMES
966ffc2fc69f        myfirstdockerimage:v0   "httpd-foreground"   2 minutes ago       Up 2 minutes        0.0.0.0:80->80/tcp   pokemon
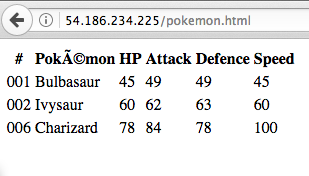
and navigating to
http://myipaddress/pokemon.html
in a browser should return our app’s homepage
and
sudo docker container lsshould return something like
CONTAINER ID        IMAGE                   COMMAND              CREATED             STATUS              PORTS                NAMES
966ffc2fc69f        myfirstdockerimage:v0   "httpd-foreground"   2 hours ago         Up 2 hours          0.0.0.0:80->80/tcp   pokemon
Finally, as mentioned above, the container runs as a process on your server. To stop it,
sudo docker container stop pokemon